
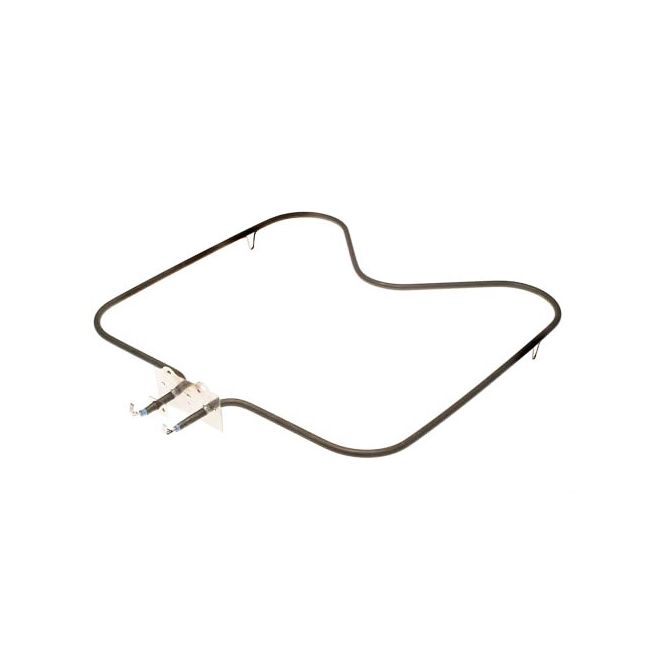
WP7406P012-60 Whirlpool Range/Stove/Oven Bake Heating Element
Availability:
In stock
Available to ship from factory 4-8 business days
Whirlpool
MFG Number
WP7406P012-60
Manufactured BY:
Whirlpool
This manufacture part number # WP7406P012-60 replaces our competitor’s part numbers: AP4101670, 1938-324, 1938-325, 1938-352, 1938324, 1938352, 1938362, 2188, AH2089584, EA2089584, PS2089584, 7406P01260, 54353, 54-856, 54-353, RP856, 7406P012-60.
Special Price
$60.99
Regular Price
$100.99
(40% off)
Range/Stove/Oven Bake Heating Element
This component is located at the bottom of your oven and is essential for heating food. If your oven produces little or no heat when baking, this part may be the solution.
Whirlpool manufactures a range of products, including Whirlpool, Amana, KitchenAid, Maytag, Jenn-Air, Magic Chef, Roper, and Admiral. They also produce items for Sears-Kenmore and Ikea.
Genuine OEM Part: Designed by Whirlpool to ensure compatibility and reliability with Maytag and Magic Chef appliances.
Spade Style Connections: Equipped with secure spade terminals for straightforward electrical connections.
Exact Fit: Dimensions of 16x16 inches with 2-inch deep terminals, ensuring a perfect fit for specific models.
Common Symptoms for Maytag Magic Chef Oven Bake Element WP7406P012-60:
- Oven not heating evenly or not heating at all
- Visible damage or breakage in the element
- Oven taking longer than usual to preheat
- Inconsistent baking results
Basic Troubleshooting for Maytag Magic Chef Oven Bake Element WP7406P012-60:
1. Check for Visual Damage: Inspect the element for any signs of wear or damage, such as blisters, breaks, or discoloration.
2. Test for Continuity: Use a multimeter to check the element for continuity. If there is no continuity, the element needs replacement.
Installation Instructions for Maytag Magic Chef Oven Bake Element WP7406P012-60:
1. Ensure Safety: Disconnect power to the oven by unplugging it or turning off the circuit breaker.
2. Access and Remove the Old Element: Remove the oven racks, unscrew the mounts, and gently pull the element forward to access the terminals.
3. Disconnect and Replace: Detach the spade connectors from the old element and attach them to the new one. Secure the new element with the original screws.
4. Operational Test: Reconnect power and briefly turn on the oven to ensure the new element works correctly.
Write Your Own Review


00701049 Bosch Range/Stove/Oven Surface Burner
Special Price
$275.99
Regular Price
$365.99
(25% off)

W10823692 Whirlpool Dual Radiant Surface Element
Special Price
$115.99
Regular Price
$223.99
(48% off)

6871W1N010E LG Surface Element Board for Range, Stove, Oven
Special Price
$78.99
Regular Price
$97.99
(19% off)

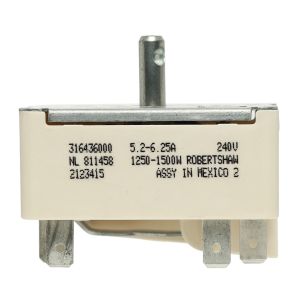
316436000 Frigidaire Surface Element Switch for Range/Stove/Cooktop
Special Price
$42.99
Regular Price
$58.99
(27% off)